
Oral Cancer Exercises for Lips Recovery Guide
May 03, 2026If you are recovering from oral cancer treatment, you may notice changes in how your lips move, how clearly you speak, or how easily you eat and drink. These changes can feel surprising or even scary, but they are very common after treatment.
Oral cancer begins in the tissues of the mouth, including the tongue, gums, cheeks, lips, roof, or floor of the mouth. Treatment such as surgery, radiation therapy, or chemotherapy is designed to remove or destroy cancer cells, but these treatments can also affect the muscles, nerves, and soft tissues that help you speak, swallow, and express emotion. Some people experience stiffness, drooling, facial asymmetry, or difficulty keeping the lips closed. Others notice fatigue when chewing or changes in speech clarity. In many cases, these changes are related to reduced muscle use, tissue tightness, and sometimes cranial nerve involvement that affects movement and sensation.
The good news is consistent muscle activity can make a meaningful difference in recovery. Guided exercises help maintain movement, improve strength, and support healing so you can return to daily activities with more comfort and confidence. Small daily habits like practicing lip movement and following a structured therapy plan can improve your ability to eat, drink, and communicate with the people you love.
In this guide, you’ll learn simple oral cancer recovery exercises for the lips, jaw, and swallowing muscles. Each step is explained in a practical way so you understand why the exercises work, how to perform them safely, and how to track your progress. You’ll also learn how to adapt exercises during radiation or after surgery and how to build them into your daily routine.
Exercise 1: Labial retraction (smile exercise)
Head and neck cancer treatment can make the simplest things smiling, speaking clearly, keeping food from collecting in your cheeks suddenly feel effortful and frustrating. If you have noticed any of these changes, you are not imagining them. They happen because treatment affects the nerves and muscles of your face, and they respond to targeted, consistent exercise.
Why this exercise matters and what it does to your muscles
Radiation and surgery change the way your facial muscles work. The nerve-muscle connection weakens, tissues stiffen, and symmetry can be lost particularly if you had nerve-sparing surgery or radiation to one side of your face. Without regular activation, these muscles continue to weaken over time.
The smile exercise activates the key muscles responsible for spreading your lips outward. Every time you perform it, you send a signal from your brain to those muscles rebuilding the connection, strengthening the fibers, and restoring the symmetry that treatment may have disrupted. Think of it as therapy for your face: small, consistent signals that add up to meaningful recovery.
Who this exercise is for
This exercise is specifically recommended if you experience any of the following:
- Difficulty with speech clarity, particularly with sounds like the letter E
- Facial asymmetry: one side of your mouth moving less than the other
- Drooling or difficulty keeping your lips closed
How to do it - step by step
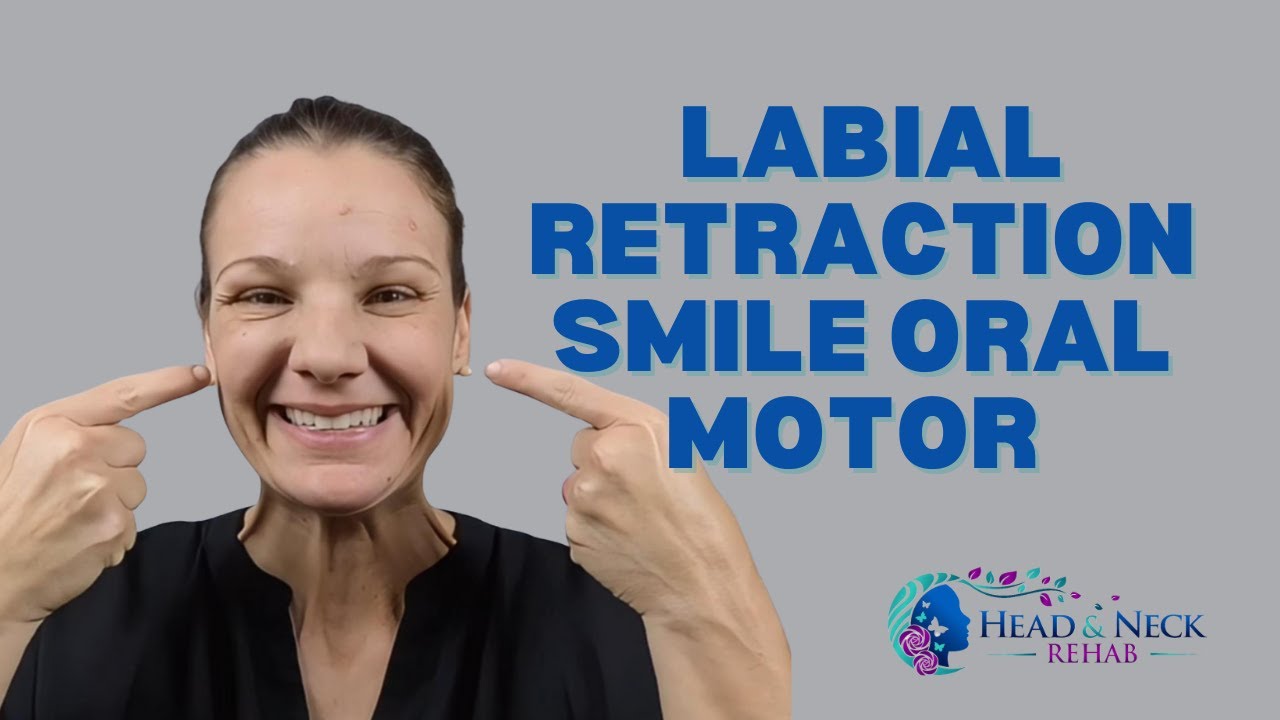
Step 1: Smile wide. Spread your lips into a big, wide smile like you are showing your teeth. Keep your jaw relaxed or only slightly open. Do not clench your teeth or bite down hard.
( This position activates the muscles that pull your lips outward and upward. Imagine someone just told you something that genuinely made you smile — that natural, full spread is the position you are aiming for. Watch in your mirror. Both sides of your mouth should move. If one side is lagging, note it — this is your starting point, not a failure. )
Step 2: Hold for 2–3 seconds. Keep the smile position steady. Breathe normally throughout do not hold your breath. Focus on keeping both sides moving equally.
( The hold is where the muscle work happens — it is the equivalent of holding a weight before lowering it. Count quietly in your head: one, two, three. That is your hold. If you feel one side pulling harder or shaking, that is the weaker side working — which means it is improving.)
Step 3: Relax and rest. Let your lips return to their natural resting position. Give yourself a moment between repetitions. do not rush.
( Three seconds of rest between repetitions allows the muscle fibres to recover before the next contraction, making each repetition more effective.)
Step 4: Repeat. Perform as directed by your clinician. A standard starting point is 10 repetitions per session.
Progression - how to advance over time
Begin with the standard smile and no added resistance. As both sides move more evenly and the hold feels steady without shaking, progress in this order:
- Smile independently, no resistance, 2–3 second hold
- Gradually increase the hold duration up to 10 seconds as strength builds
- Add light finger resistance - place your fingertips at the corners of your mouth and apply gentle outward pull as you smile
You are ready to progress when you can complete all repetitions without the held side shaking, and both sides of your mouth are moving symmetrically.
How you will know it is working
Progress in facial muscle recovery is real but subtle at first. Look for these signs:
- Both sides of your mouth begin moving more evenly and symmetrically
- You can hold the full smile for longer without trembling
- The E sound becomes clearer when you speak
|
Common mistakes — read this before you start
If you catch yourself doing any of these, stop, reset, and begin the repetition again. |
Adapting to your treatment phase
Before treatment: Build strength and establish your baseline of movement. Both sides should be working fully before treatment begins.
During radiation: Radiation makes tissues progressively stiffer and 'woody.' Your goal during this phase is not to build new strength - it is to maintain whatever movement you currently have. Perform gentle, pain-free repetitions. Use water or oral lubricant if your mouth is dry. Even a small, comfortable smile repeated consistently is clinically valuable.
After treatment: Gradually reintroduce resistance as recovery progresses. Follow your clinician's guidance on when to advance.
Watch the practical demonstration now ! Labial retraction smile oral motor exercise
|
Stop and contact your clinician if you experience:
|
|
Build it into your day - your habit plan
Your action step for today: stand in front of a mirror right now and perform five repetitions. Note which side feels weaker. That is your starting point. |
Exercise 2: Open → round → smile (labial round and retraction)
After head and neck cancer treatment, your lips may feel stiff, uncoordinated, or as though they are working independently of each other. Eating becomes effortful. Drinking through a straw feels unreliable. Words that should flow begin to catch. This is not permanent, it is a predictable effect of treatment that responds directly to the right exercise. This one is specifically designed to restore the coordination and flexibility your lips need for daily life.
Why this exercise matters and what it does to your muscles
Your lips rely on two opposing muscle groups working in smooth sequence: the muscles that round them into a pucker, and the muscles that pull them into a smile. After radiation, these muscles can lose their ability to transition fluidly between positions: a process called reduced muscle elasticity combined with impaired motor coordination.
This exercise trains both muscle groups in sequence, forcing them to alternate rapidly and smoothly. It improves elasticity ( the ability of the muscle fibres to stretch and return) it retrains your brain to coordinate these transitions automatically and strengthens the muscles that round your lips .
Who this exercise is for
This exercise is recommended if you experience:
- Difficulty with speech clarity particularly consonants that require lip rounding or spreading
- Trouble managing food in your mouth or maintaining a seal around a straw or cup
- Jaw tightness (trismus) related to radiation fibrosis, the open jaw position helps maintain jaw mobility simultaneously
- Lip stiffness that makes transitions between lip positions feel jerky or effortful
How to do it - step by step
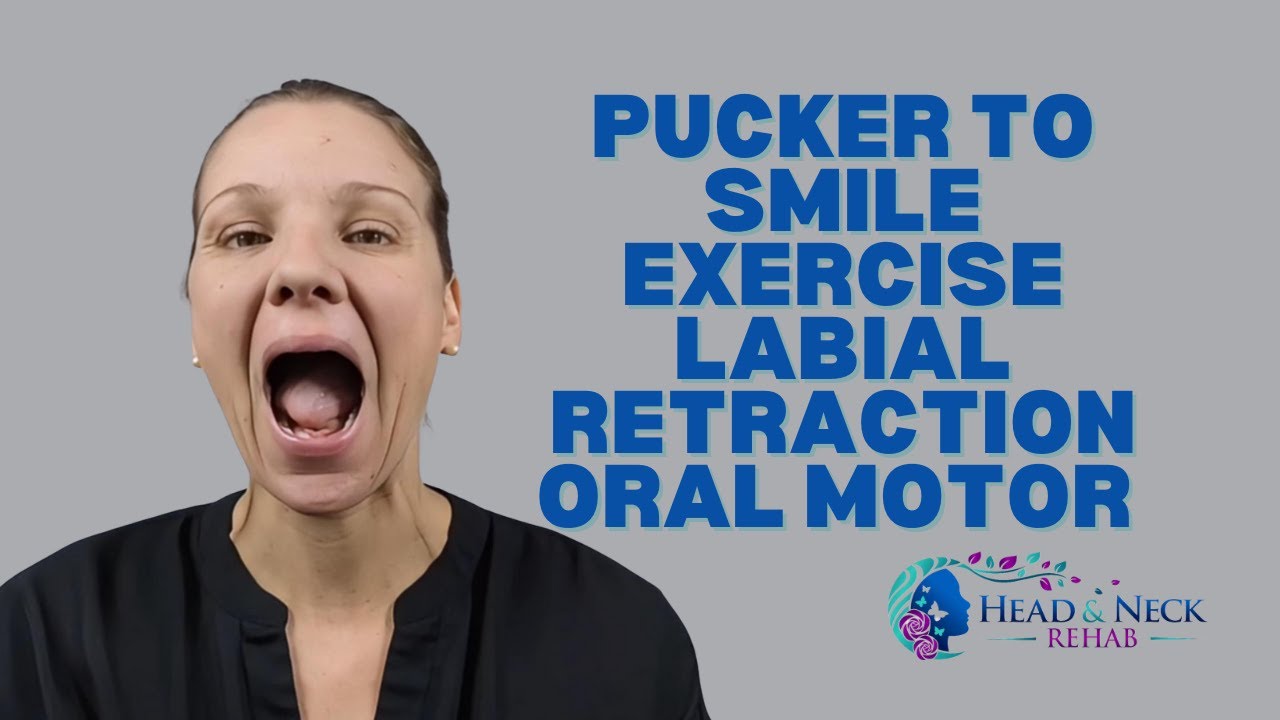
Each transition — open, round, smile — should be a distinct, deliberate, full movement. Do not rush.
Step 1: Open wide. Open your mouth comfortably wide. Keep your jaw relaxed — do not force it. This is your starting position.
( Opening the jaw gently maintains jaw mobility while preparing the lip muscles to move from a neutral position. Think of it as the reset position; the neutral state your lips return to before each new movement. )
Step 2: Pucker. Bring your lips into a tight, forward pucker as if you are about to whistle. Hold briefly (1–2 seconds). Keep your jaw stable and mid-open.
( The pucker activates the circular muscle around your mouth. This is the muscle responsible for sealing your lips and rounding sounds. Imagine blowing out a candle slowly that forward, tight lip position is what you are aiming for. The pucker should come entirely from your lips. If your jaw is moving up and down to help, or your nose is scrunching, you are recruiting the wrong muscles.)
Step 3: Transition to smile. Smoothly shift from the pucker into a full, wide smile. Keep the movement fluid not a snap, not a hesitation.
( This transition is where the coordination training happens. The brain must switch signals between opposing muscle groups in real time. Think of it as a dial moving from O to E a smooth, continuous rotation rather than two separate positions with a gap between them. If the transition feels jerky, slow down. Smooth and slow is more effective than fast and incomplete.)
Step 4: Relax and repeat. Return to the open starting position, rest briefly, and repeat. Perform as directed by your clinician.
Progression - how to advance over time
- Slow, separate movements, practice each position individually before connecting them
- Smooth continuous transitions at a comfortable pace
- Gradually increase movement speed and hold time while maintaining full range, the pucker should be fully tight, the smile fully wide
- Add gentle finger resistance at the corners of your mouth as you smile
How you will know it is working
- The transition from pucker to smile becomes smooth rather than jerky
- Your pucker gets tighter and your smile gets wider over time
- You notice better lip seal when eating and drinking — less leakage
- Speech sounds that require lip movement become clearer
|
Common mistakes — read this before you start
Rushing the transition: fast and incomplete defeats the purpose. Slow, full, and smooth wins. |
Adapting to your treatment phase
Before treatment: Focus on achieving maximum movement range in each position. Establish what full looks like for you before treatment changes it.
During radiation: Slow down the transitions and keep movements gentle. The goal is to prevent the lips from stiffening into one position. Even small, pain-free transitions performed consistently are clinically significant.
After treatment: Shift your focus to improving speed , coordination to return speech and eating function to normal.
Watch the practical demonstration now ! Pucker to Smile Exercise Labial Retraction Oral Motor
|
Stop and contact your clinician if you experience:
|
|
Build it into your day — your habit plan
Your action step for today: perform one slow open–round–smile sequence in front of a mirror. Notice which transition feels least smooth. That is where your focus starts. |
Exercise 3: Pucker exercise (lip rounding and seal)
Drooling without meaning to. Food or liquid escaping from the front of your mouth. Struggling to use a straw. These are not minor inconveniences, they affect your confidence, your social comfort, and your nutrition. They happen because the circular muscle around your lips has weakened or lost its ability to generate enough pressure to create a seal. This exercise directly rebuilds that pressure and control.
Why this exercise matters and what it does to your muscles
The orbicularis oris is the circular muscle that surrounds your lips. It is responsible for sealing your lips, maintaining lip pressure, and producing sounds like P, B, and M. all of which require your lips to press together firmly.
After head and neck cancer treatment, this muscle weakens and loses its ability to generate inward pressure. The pucker exercise is the primary way to rebuild that strength. Every pucker you hold is a contraction of this muscle and repeated contractions, like any muscle training, progressively increase both strength and endurance.
Who this exercise is for
This exercise is specifically recommended if you experience:
- Drooling or difficulty keeping saliva inside your mouth
- Food or liquid leaking from the front of your mouth during meals
- Difficulty using a straw, air leaking in around the seal
- Trouble producing clear P, B, or M sounds
How to do it - step by step
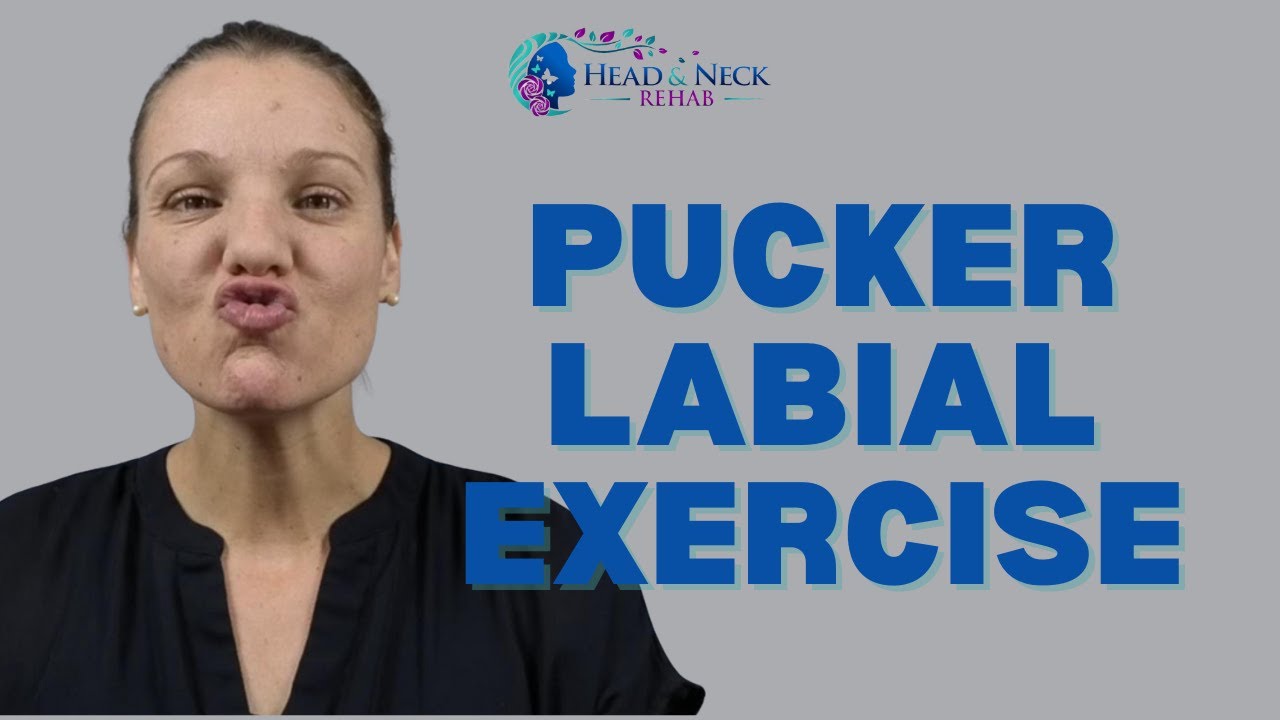
Step 1: Pucker your lips. Bring your lips forward into a tight pucker as if you are about to kiss something. The movement comes entirely from your lips, not your jaw or chin.
( This position creates maximum activation of the orbicularis oris: the entire circular muscle contracts around the lip opening. Imagine kissing something, a genuine, firm forward pucker. Not a tight-lipped press, but a true forward pout. Check in your mirror. Your chin should not be dimpling. If it is, you are using the chin muscle to compensate , bring the effort back to your lips. )
Step 2: Hold for 2–3 seconds. Maintain the pucker position without letting it collapse. Breathe normally through your nose.
( The sustained hold builds endurance alongside strength, your lip seal during eating must last an entire meal, not just a single moment. Count to three. Feel the muscle holding. That sensation of effort is the muscle fibres working.. )
Step 3: Relax. Release the pucker and let your lips rest naturally. Pause briefly before the next repetition.
( Do not immediately rush to the next pucker. A brief rest between contractions allows the muscle to recover and makes each subsequent repetition more effective )
Step 4: Repeat 10 times. Complete this sequence daily as tolerated.
Progression - how to advance over time
- Light pucker with no resistance: focus on feeling the correct muscle activating
- Tighter pucker: work toward maximum lip forward projection
- Finger resistance: place your fingers at the corners of your lips and apply gentle outward pull as you pucker against it
- Button-and-string exercise: hold a button between your lips by a string while it is gently pulled outward. This is the most advanced level of resistance for this exercise
How you will know it is working
- You can use a straw without air leaking in around the seal
- You can hold air in your cheeks for at least 5 seconds without it escaping
- You notice less drooling throughout the day
- P, B, and M sounds become clearer in conversation
|
Common mistakes — read this before you start
|
Adapting to your treatment phase
Before treatment: Focus on building maximum lip squeeze strength and establishing your baseline pucker pressure.
During radiation: Keep your lips well moisturized with lip balm or an oral lubricant throughout this phase, dry, cracked lips make this exercise significantly more difficult and can create entry points for infection. Reduce the hold duration if soreness develops.
After treatment: Progressively increase resistance using the stages above. If nerve involvement has occurred, use touch cues — tap your lips gently with your fingertips before each repetition to help wake up the nerve-muscle signal.
Watch the practical demonstration now ! Pucker Labial Exercise
|
Stop and contact your clinician if you experience:
|
|
Build it into your day — your habit plan
Your action step for today: perform one pucker and hold it for a count of three. Notice whether your chin dimples. If it does, that is your first correction to work on. If you’re ready to take the next step in your recovery, you don’t have to do it alone. Book a call with Lauren Meffen to create a personalized plan and start rebuilding strength, movement, and confidence. https://clarity.fm/laurenmeffen |
Stay connected with news and updates!
Join our mailing list to receive the latest news and updates from our team.
Don't worry, your information will not be shared.
We hate SPAM. We will never sell your information, for any reason.
